了解springboot
什么是springboot
springboot是javaweb开发框架的演化,约定大约配置。
maven、spring、springMvc都是约定大于配置。
优点
- 约定大于配置;
- 内置tomcat;
什么是微服务
优点
- 节省调用资源;
- 每个功能都是一个可替换,可独立升级的资源
第一个springboot程序
helloWordDemo
@RestController
public class HelloController {
    @RequestMapping("/")
    public String hello() {
        return "hello springboot!";
    }

    @GetMapping("bay")
    public String bay() {
        return "bay springboot!";
    }
}
# 应用名称
spring.application.name=boot
# 应用服务 WEB 访问端口
server.port=80访问路径:http://localhost/
SpringBoot返回json数据
@RestController
public class JsonHelloWorldController {
    @GetMapping("/getJson")
    public Person hello() {
        Person person = new Person();
        person.setAge(11);
        person.setList(Arrays.asList("1", "2", "3"));
        return person;
    }
}

//返回
{"name":null,"age":11,"birthday":null,"dog":null,"list":["1","2","3"],"map":null}
其实 Spring Boot 也是引用了 JSON 解析包 Jackson,那么自然我们就可以在 Demo 对象上使用 Jackson 提供的 json 属性的注解,对时间进行格式化,对一些字段进行忽略等等。
注解的区别
@Controller和@RestControll的区别
@RestController注解相当于@ResponseBody + @Controller合在一起的作用。
- 如果只是使用@RestController注解Controller,则Controller中的方法无法返回jsp页面,或者html,配置的视图解析器InternalResourceViewResolver不起作用,返回的内容就是Return 里的内容;
- 如果需要返回到指定页面,则需要用 @Controller配合视图解析器InternalResourceViewResolver才行。 如果需要返回JSON,XML或自定义mediaType内容到页面,则需要在对应的方法上加上@ResponseBody注解;
例:
- 使用@Controller注解
- 在对应的方法上,视图解析器可以解析return 的jsp,html页面,并且跳转到相应页面;
- 若返回json等内容到页面,则需要加@ResponseBody注解
- @RestController注解
- 相当于@Controller+@ResponseBody两个注解的结合。
- 返回json数据不需要在方法前面加@ResponseBody注解了
- 使用@RestController这个注解,就不能返回jsp,html页面,视图解析器无法解析jsp,html页面
@SpringBootApplication注解作用
标注在某个类上说明这个类时SpringBoot的主配置类,SpringBoot就应该运行这个类的main方法来启动SpringBoot应用;
@Target({ElementType.TYPE})
@Retention(RetentionPolicy.RUNTIME)
@Documented
@Inherited
@SpringBootConfiguration
@EnableAutoConfiguration
@ComponentScan(
    excludeFilters = {@Filter(
    type = FilterType.CUSTOM,
    classes = {TypeExcludeFilter.class}
), @Filter(
    type = FilterType.CUSTOM,
    classes = {AutoConfigurationExcludeFilter.class}
)}
)
public @interface SpringBootApplication {
   //xxxx
}
@ComponentScan
在spring中等同于XML的作用,自动扫描并加载符合条件的bean到IOC容器中。
@SpringBootConfiguration
springboot的配置类,标注在某个类上,表示这是一个SpringBoot的配置类;
@Target({ElementType.TYPE})
@Retention(RetentionPolicy.RUNTIME)
@Documented
@Configuration
public @interface SpringBootConfiguration {

}

@Target({ElementType.TYPE})
@Retention(RetentionPolicy.RUNTIME)
@Documented
@Component
public @interface Configuration {

}
@Configuration
配置类,对应spring的xml配置文件
@Component
spring中作为依赖注入的作用,说明启动类本身也是spring容器中的组件,负责启动应用;
@EnableAutoConfiguration
开启自动配置功能,开启后配置生效;
@AutoConfigurationPackage:自动配置包
@Target({ElementType.TYPE})
@Retention(RetentionPolicy.RUNTIME)
@Documented
@Inherited
@Import({Registrar.class})
public @interface AutoConfigurationPackage {
    String[] basePackages() default {};

    Class<?>[] basePackageClasses() default {};
}
@Import:Spring底层注解,给容器中一个组件;
Registrar.class 作用:将主启动类的所在包及包下面所有子包里面的所有组件扫描到Spring容器 ;
@Import({AutoConfigurationImportSelector.class})
AutoConfigurationImportSelector :自动配置导入选择器
//AutoConfigurationImportSelector类获取候选者的配置
protected List<String> getCandidateConfigurations(AnnotationMetadata metadata, AnnotationAttributes attributes) {
    List<String> configurations = SpringFactoriesLoader.loadFactoryNames(this.getSpringFactoriesLoaderFactoryClass(), this.getBeanClassLoader());
    Assert.notEmpty(configurations, "No auto configuration classes found in META-INF/spring.factories. If you are using a custom packaging, make sure that file is correct.");
    return configurations;
}
//返回的就是我们最开始看的启动自动导入配置文件的注解类;EnableAutoConfiguration
protected Class<?> getSpringFactoriesLoaderFactoryClass() {
    return EnableAutoConfiguration.class;
}

//返回loadSpringFactories方法
public static List<String> loadFactoryNames(Class<?> factoryType, @Nullable ClassLoader classLoader) {
    ClassLoader classLoaderToUse = classLoader;
    if (classLoaderToUse == null) {
        classLoaderToUse = SpringFactoriesLoader.class.getClassLoader();
    }
    String factoryTypeName = factoryType.getName();
    return loadSpringFactories(classLoaderToUse).getOrDefault(factoryTypeName, Collections.emptyList());
}


public static final String FACTORIES_RESOURCE_LOCATION = "META-INF/spring.factories";

private static Map<String, List<String>> loadSpringFactories(ClassLoader classLoader) {
    //获得classLoader , 我们返回可以看到这里得到的就是EnableAutoConfiguration标注的类本身
    Map<String, List<String>> result = cache.get(classLoader);
    if (result != null) {
        return result;
    }

    result = new HashMap<>();
    try {
        //去获取一个资源 "META-INF/spring.factories"
        Enumeration<URL> urls = classLoader.getResources(FACTORIES_RESOURCE_LOCATION);
        //将读取到的资源遍历,封装成为一个Properties
        while (urls.hasMoreElements()) {
            URL url = urls.nextElement();
            UrlResource resource = new UrlResource(url);
            Properties properties = PropertiesLoaderUtils.loadProperties(resource);
            for (Map.Entry<?, ?> entry : properties.entrySet()) {
                String factoryTypeName = ((String) entry.getKey()).trim();
                String[] factoryImplementationNames =
                    StringUtils.commaDelimitedListToStringArray((String) entry.getValue());
                for (String factoryImplementationName : factoryImplementationNames) {
                    result.computeIfAbsent(factoryTypeName, key -> new ArrayList<>())
                        .add(factoryImplementationName.trim());
                }
            }
        }

        // Replace all lists with unmodifiable lists containing unique elements
        result.replaceAll((factoryType, implementations) -> implementations.stream().distinct()
                          .collect(Collectors.collectingAndThen(Collectors.toList(), Collections::unmodifiableList)));
        cache.put(classLoader, result);
    }
    catch (IOException ex) {
        throw new IllegalArgumentException("Unable to load factories from location [" +
                                           FACTORIES_RESOURCE_LOCATION + "]", ex);
    }
    return result;
}
spring.factories文件是自动配置的根源,里面的类都注入到IOC容器中。
路径:org.springframework.boot.autoconfigure包下的META-INF/spring.factories;
结论:
- SpringBoot在启动的时候从类路径下的META-INF/spring.factories中获取EnableAutoConfiguration指定的值;
- 将这些值作为自动装配类导入到容器中,自动装配类就生效,进行自动装配工作;
- 整个J2EE的整体解决方案和自动配置都在org.springframework.boot.autoconfigure的jar包中;
- 会给容器中导入非常多的自动配置类(XXXAutoConfiguration),就是给容器中导入这个场景需要的组件,并配置好这些组件;
- 有了自动配置类,免去了手动编写配置注入功能组件的工作。
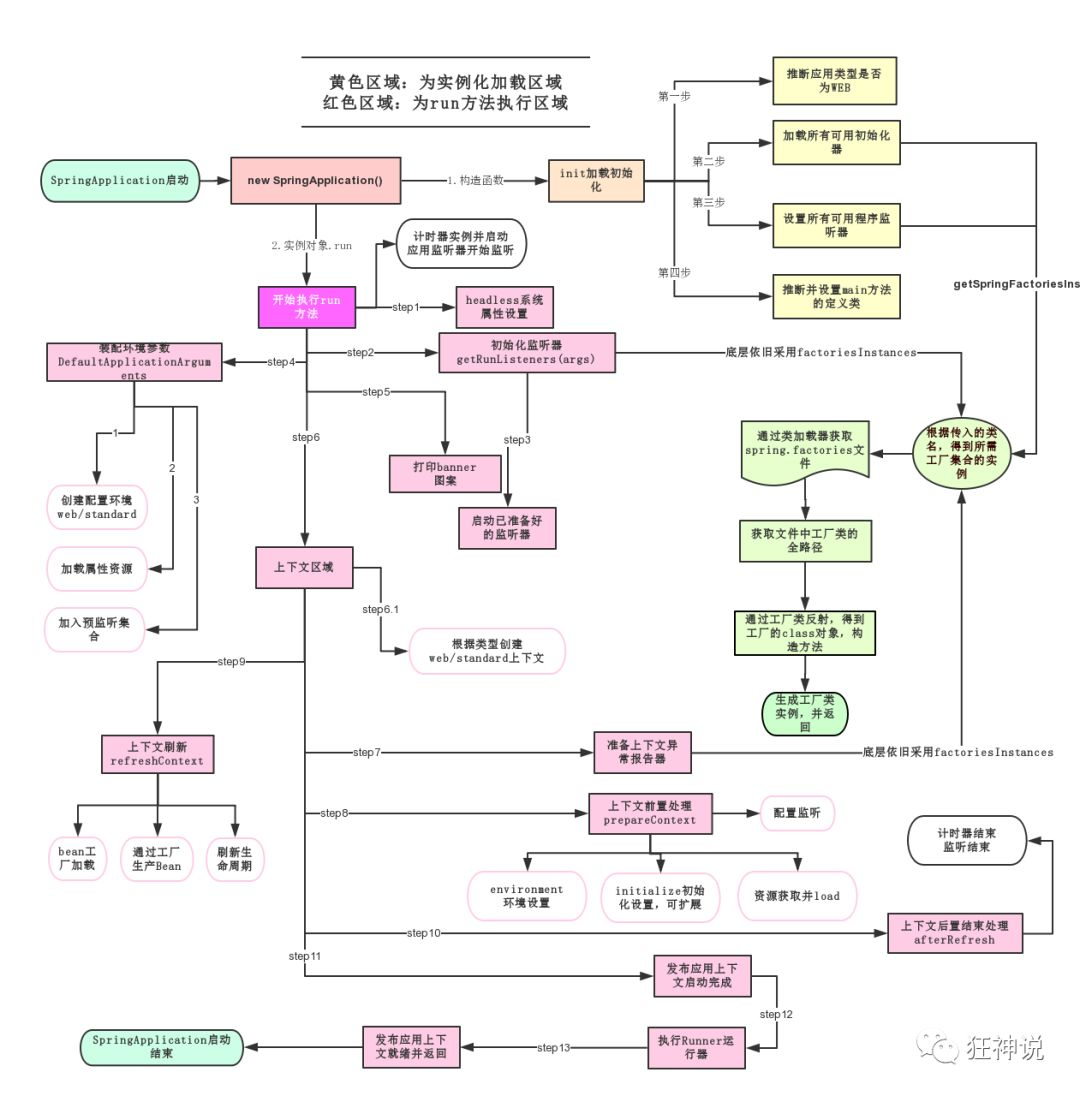
SpringApplication作用
- 推断应用的类型是普通的项目还是web项目;
- 查找并加载所有可用初始化器,设置到initiaizers属性中;
- 找出所有的应用程序监听器,设置到listeners属性中;
- 推断并设置main方法的定义类,找到运行的主类。
run方法流程
依赖
<!-- 父项目,springboot的版本的父类引用,里面引入了所有需要的依赖已经版本 -->
<parent>
  <groupId>org.springframework.boot</groupId>
  <artifactId>spring-boot-starter-parent</artifactId>
  <version>2.4.2</version>
  <relativePath/> <!-- lookup parent from repository -->
</parent>
<!--springboot启动器 -->
<dependency>
  <groupId>org.mybatis.spring.boot</groupId>
  <artifactId>mybatis-spring-boot-starter</artifactId>
</dependency>
<!-- springboot web服务器 -->
<dependency>
  <groupId>org.springframework.boot</groupId>
  <artifactId>spring-boot-starter-web</artifactId>
</dependency>
父项目:在spring中父项目中引用了许多常用的依赖以及中间件启动器,并绑定了版本,在使用时不需要绑定版本,若需要使用的版本在父项目中没有约定再手动绑定。
spring-boot-starter-web:导入web模块正常运行所依赖的组件;
Yaml语法
在SpringBoot中使用全局配置文件,配置文件名称是固定的:
- application.properties
- 语法结构:key=value
- application.yaml
- 语法结构:key:空格value
作用:修改SpringBoot自动配置的默认值,修改boot的自动配置已经配置好了端口等信息。
# 应用服务 WEB 访问端口
server.port=80server:
port: 80yaml概述
语法要求严格,空格不可省略,以缩进进行控制层级关系,只要是左对齐的一列数据都是同一个层级,属性和值的而大小写都是敏感的。
server:
  port: 80
person:
name: 张三
age: 13
birthday: 1997/12/13
dog:
name: 旺财
age: 12
list:
- 1
- 2
- 3
map: {1: 1,2: 2}@Data
@Component
@ConfigurationProperties(prefix = "dog")
public class Dog {
private String name;
private int age;
}
@Data
@Component
@ConfigurationProperties(prefix = "person")
public class Person {
private String name;
private int age;
private Date birthday;
private Dog dog;
private List<String> list;
private Map<String, String> map;
}
//测试
@SpringBootTest
class BootApplicationTests {
@Resource
private Person person;
@Test
void contextLoads() {
System.out.println(person);
}
}
//输出
Person(name=张三, age=13, birthday=Sat Dec 13 00:00:00 CST 1997, dog=Dog(name=旺财, age=12), list=[1, 2, 3], map={1=1, 2=2})松散绑定:yaml支持松散绑定,即若实体类中参数名为lastName,在yaml中可以为last-name表示。
@ConfigurationProperties(prefix = “person”)
将配置文件中配置的每一个属性的值,映射到这个组件(类)中,告诉springboot将本类中的虽有属性和配置文件中相关的配置进行绑定,参数prefix将配置文件中的person下面的属性一一对应。
使用该注解需要添加依赖:
<!-- 导入配置文件处理器,配置文件进行绑定就会有提示,需要重启 -->
<dependency>
  <groupId>org.springframework.boot</groupId>
  <artifactId>spring-boot-configuration-processor</artifactId>
  <optional>true</optional>
</dependency>
@PropertySource(value = “classpath:dog.properties”)
指定文件读取信息
@Value(”${name}”)
- 与@PropertySource注解使用指定文件下的属性值作为默认值;
@Data
@Component
@PropertySource(value = "classpath:dog.properties")
public class Dog {
    @Value("${dog.name}")
    private String name;
    private int age;
}dog.name=xxx注意:在编写properties文件时有可能保存会乱码,需要对idea配置进行修改settings⇒FileEncodeings

- 单独使用时,读取application.yaml文件下的属性值作为默认值。
@Data
@Component
public class Dog {
    @Value("${dog.name}")
    private String name;
    private int age;
}
dog:
age: 12
name: xxx@ConfigurationProperties和@PropertySource/@Value区别
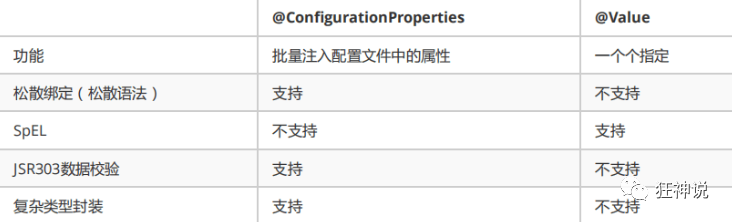
- @ConfigurationProperties只需要写一次即可 , @Value则需要每个字段都添加
- 松散绑定:如我的yml中写的last-name,这个和lastName是一样的, - 后面跟着的字母默认是大写的。这就是松散绑定。可以测试一下
- JSR303数据校验 , 这个就是我们可以在字段是增加一层过滤器验证 , 可以保证数据的合法性
- 复杂类型封装,yml中可以封装对象 , 使用value就不支持
yaml多模块
在yaml中若存在多套环境配置,不需要创建多个文件,可用过配置切换环境。
server:
  port: 80

#选择需要激活的模块
spring:
  profiles:
    active: dev

---
server:
  port: 81
spring:
  profiles: dev

---
server:
  port: 8080
spring:
profiles: prod注意:若yaml和properties配置了相同的内容,且没有激活其他环境,则默认使用properties配置文件内容。
JSR303数据校验及多环境切换
在springboot中可以用@validated进行数据校验,如果数据异常则则会统一抛出异常,方便异常中心统一处理。
<dependency>
  <groupId>org.hibernate</groupId>
  <artifactId>hibernate-validator</artifactId>
  <version>5.3.6.Final</version>
</dependency>chenkdata:
name: 123@Data
@Component
@Validated
@ConfigurationProperties(prefix = "chenkdata")
public class CheckData {
@Email(message = "不是合法邮件")
private String name;
}
//输出
HV000030: No validator could be found for constraint 'javax.validation.constraints.Email' validating type 'java.lang.String'. Check configuration for 'name'常见校验
@NotNull(message="名字不能为空")
private String userName;
@Max(value=120,message="年龄最大不能查过120")
private int age;
@Email(message="邮箱格式错误")
private String email;

空检查
@Null       验证对象是否为null
@NotNull    验证对象是否不为null, 无法查检长度为0的字符串
@NotBlank   检查约束字符串是不是Null还有被Trim的长度是否大于0,只对字符串,且会去掉前后空格.
@NotEmpty   检查约束元素是否为NULL或者是EMPTY.

Booelan检查
@AssertTrue     验证 Boolean 对象是否为 true
@AssertFalse    验证 Boolean 对象是否为 false

长度检查
@Size(min=, max=) 验证对象(Array,Collection,Map,String)长度是否在给定的范围之内
@Length(min=, max=) string is between min and max included.


日期检查
@Past       验证 Date 和 Calendar 对象是否在当前时间之前
@Future     验证 Date 和 Calendar 对象是否在当前时间之后
@Pattern    验证 String 对象是否符合正则表达式的规则
多配置文件
在编写配置文件时,可以做多个环境文件配置,作为多环境切换,如:开发,测试,生产等。
appilcation-test.properties、application-dev.properties等。
springboot中启动默认使用application.properties,可在该文件中修改配置,指定配置文件的使用:
#激活application-dev.properties文件作为环境配置的唯一选项
spring.profiles.active=dev
配置文件加载位置
springboot启动会扫以下位置的application.properties会yaml文件作为默认配置
:::info 优先级1:项目路径下的config文件夹配置文件
优先级2:项目路径下配置文件
优先级3:资源路径下的config文件夹配置文件
优先级4:资源路径下配置文件
:::
优先级由高到低,高优先级覆盖低优先级的配置。
自动配置原理
springboot中存在大量的配置,在spring加载时会根据不同的注解判断配置类是否生效。
- 一旦配置类生效,这个配置类就会给容器中添加各种组件;
- 这些组件的数据从对应的properties类中获取,这些类里的每一个属性有和配置文件绑定的;
- 所有在配置文件中能配置的属性都是在xxxProperties类中封存着;
- 配置文件能配置什么就可以参照某功能对应的属性类来配置
xxxAutoConfiguration:自动配置类,给容器中添加组件;
xxxProperties:封装配置文件中相关属性;
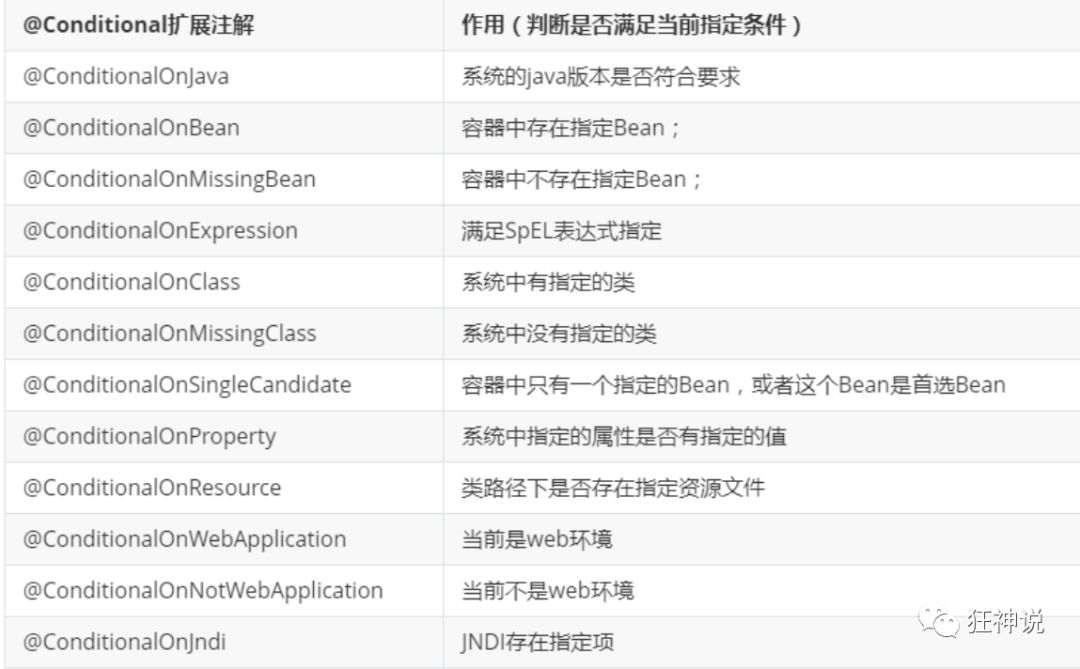
@Conditional
自动配置类必须在一定条件下才能生效。
@Conditional派生注解,必须在指定条件成立,才会给容器中添加组件,配置里的所有内容才生效。
满足条件才会生效,则也会存在不满足条件但加载了的配置类,可以通过debug=true属性,控制台打印自动配置报告。
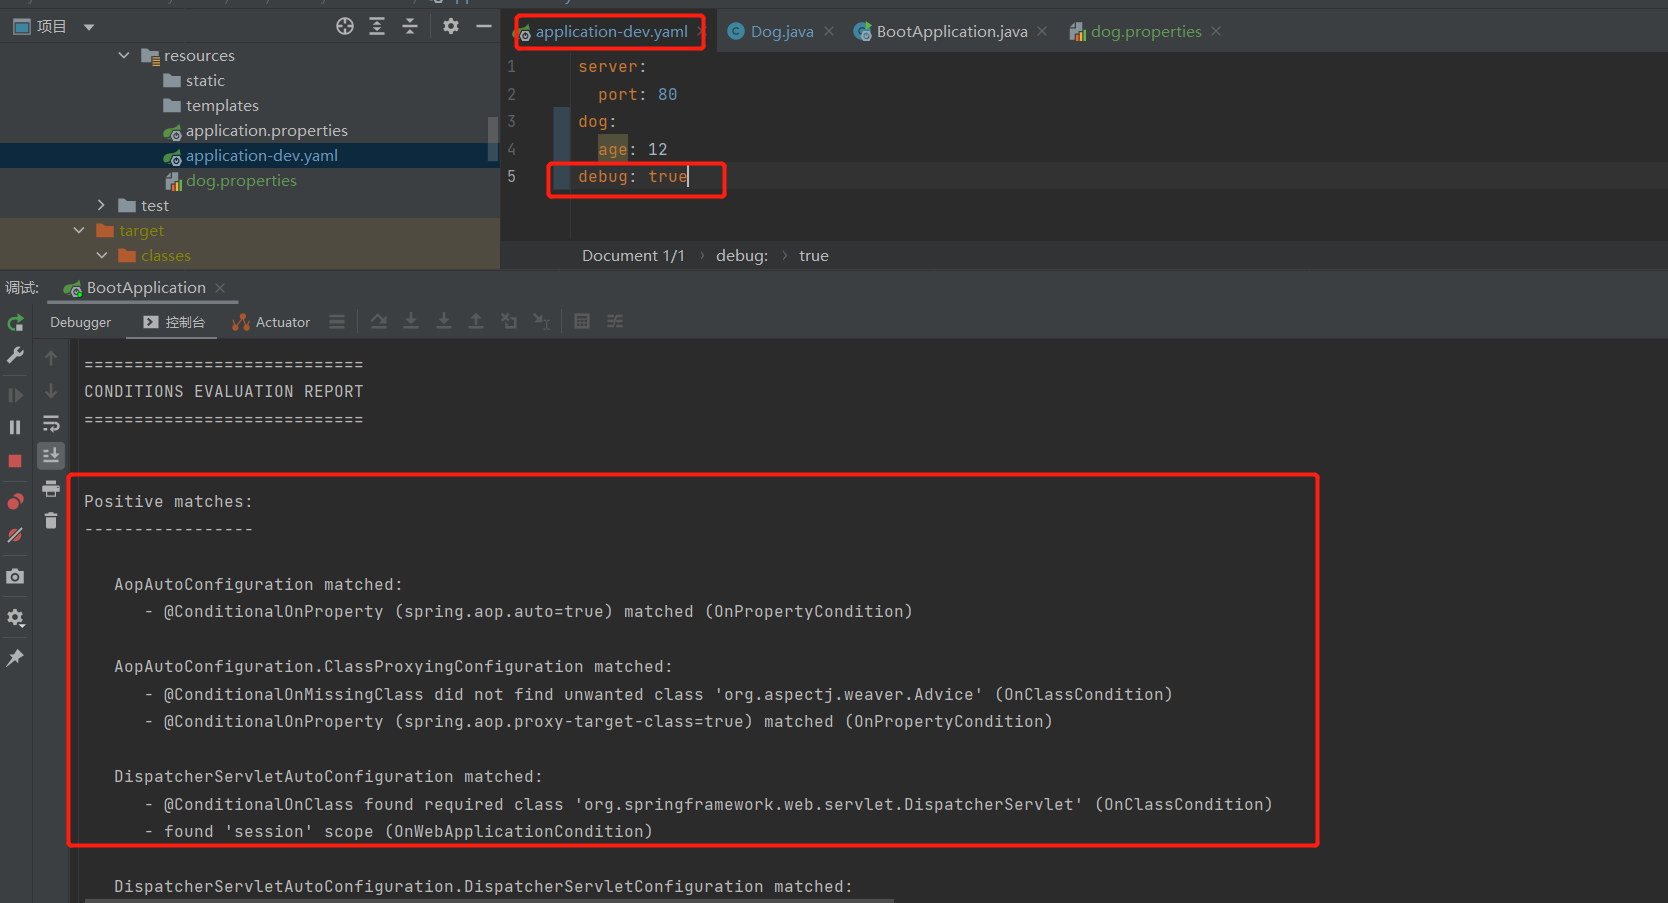
Positive matches:(自动配置类启用的:正匹配)
Negative matches:(没有启动,没有匹配成功的自动配置类:负匹配)
Unconditional classes: (没有条件的类)
构建Restful Api
- @Controller:修饰class,用来创建处理http请求的对象;
- @RestController:Spring4之后加入的注解,原来在@Controller中返回json需要@ResponseBody来配合,如果直接用@RestController替代@Controller就不需要再配置@ResponseBody,默认返回json格式;
- @RequestMapping:配置url映射。现在更多的也会直接用以Http Method直接关联的映射注解来定义,比如:GetMapping、PostMapping、DeleteMapping、PutMapping等。
@RestController
@RequestMapping("/user")
public class RestFulController {
    private static final Map<String, User> userMap = getData();

    public static Map<String, User> getData() {
        Map<String, User> userMap = new HashMap<>();
        User user1 = new User();
        user1.setUserName("张三");
        user1.setUid("1");
        user1.setPassword("张三123");
        userMap.put(user1.getUserName(), user1);
        user1 = new User();
        user1.setUserName("李四");
        user1.setUid("2");
        user1.setPassword("李四123");
        userMap.put(user1.getUserName(), user1);
        user1 = new User();
        user1.setUserName("王五");
        user1.setUid("3");
        user1.setPassword("王五123");
        userMap.put(user1.getUserName(), user1);
        return userMap;
    }

    @GetMapping("/")
    public List<User> getUsers() {
        return new ArrayList<>(userMap.values());
    }

    @PostMapping("/addOrUpd")
    public int addOrUpd(User user) {
        User userOld = userMap.get(user.getUserName());
        if (Objects.nonNull(userOld)) {
            userOld.setUid(user.getUid());
            userOld.setPassword(user.getPassword());
            return 2;
        } else {
            userMap.put(user.getUserName(), user);
            return 1;
        }
    }

    @DeleteMapping("/delete")
    public int delete(String userName) {
        User user = userMap.get(userName);
        if (Objects.nonNull(user)) {
            userMap.remove(userName);
            return 1;
        } else {
            return 0;
        }
    }
}
构建Swagger2接口文档
<dependency>
  <groupId>io.springfox</groupId>
  <artifactId>springfox-swagger-ui</artifactId>
  <version>2.9.2</version>
</dependency>
<!--doc.html模式        -->
<dependency>
  <groupId>com.github.xiaoymin</groupId>
  <artifactId>swagger-bootstrap-ui</artifactId>
  <version>1.9.2</version>
</dependency>